Showing posts with label food. Show all posts

23.12.24

Homemade Irish Cream aka DIY Bailey's

Even though I only tend to taste Bailey's once a year (at Christmas), and too much is sickly sweet and rich, Baileys is quite possibly the most delicious alcoholic beverage I've ever had. I think most adults I know would say the same. Nobody drinks Baileys on a patio in the summer or to accompany a great meal. It's not an everyday drink at all, but oh is it divine. Making it yourself is really easy too! It takes about 10 minutes total and makes for a thoughtful gift or party favour. Here's my recipe:


Ingredients:
  • 2 cups Irish Whisky (I use Canadian Club)
  • 2 cups 10% cream 
  • 2 cans sweetened condensed milk
  • 60 grams of chocolate (I use milk chocolate, but you choose!)
  • 1 tb vanilla extract
  • 2 ts decaf instant coffee or espresso
Method:
  • In a pot heated right between low and medium, warm the 10% cream, chocolate, instant coffee powder and vanilla extract. 
  • Whisk constantly until the chocolate is melted and mixed well.
  • Take the mixture off the heat and stir in whisky and sweetened condensed milk
It's that easy! Tastes exactly like Bailey's but made with fresh ingredients and you get to control the level of sweetness and alcohol. If you prefer less alcohol than traditional Bailey's, use less whisky than I've listed. If you want less sugar, half the chocolate. If you want caffeinated Baileys, swap the decaf instant coffee for the real deal. I bring jars or bottles of my DIY Irish Cream to my brothers and in-laws every year at Christmas and just made my annual batch. Enjoy!

10.9.23

Adventures in Sourdough

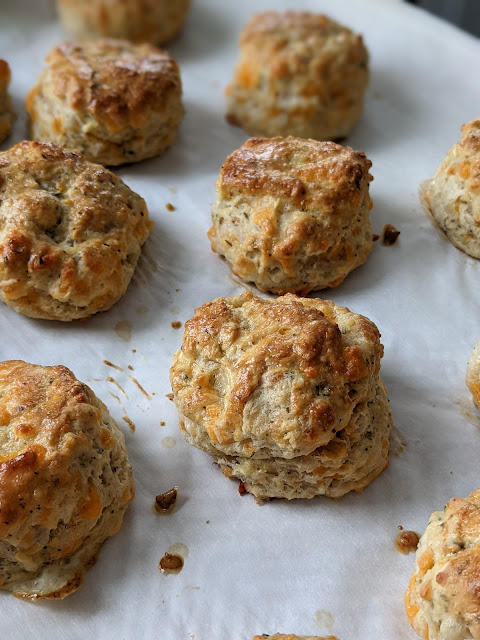
If I could choose one food to eat forever it would be bread. I'm all for eating healthy foods, but diets that completely eliminate bread (unless of course you have celiac disease) leave me dubious bordering on side-eye. Is there anything more comforting that a warm piece of bread? When I'm hungry, it's probably the first food group that pops into my mind. There's truly not a better food in my opinion. Baking my own has become a hobby, as you probably know by now. My focaccia recipe is on rotation, and one my my most watched reels on Instagram. Have you tried it yet? I hope you have! My simple sourdough-ish bread recipe is quick and quality, and I made it weekly for years, though now I'm dabbling in sourdough.


Perhaps it's better I say re-dabbling, since I first started the sourdough journey a few years ago, like most of the quarantine bread mavens, in 2020. When I started my Sourdough journey, I had a lot of time on my hands to fail, since, like everyone else, I was staying home. And it's a good thing, because fail I did! There's a poster at my school which says, "FAIL: first attempt in learning" which is really sweet and also relevant to sourdough! I tried for weeks to make my own starter and then my own sourdough from said starter. It never rose, at least not fully, and was really frustrating. Maybe not so bad if flour wasn't so hard to come by during those first months of COVID. Eventually a friend who was on the same journey offered to bring me some of his starter in exchange for some flour. Only one of us has a Costco membership after all. Deal struck! And with his initial starter (Thanks Ru!), I was eventually successful. That was years ago and I'm only recently circling back to sourdough, inspired by Justine Doiron. I don't actually use her recipe (it requires 2 full days!), but her addictive videos get me in the cooking/baking/preparing mood that always help culinary adventures.

My favourite way to eat sourdough is topped with anchovy green sauce or a honey and salt combo. I should add that I don't make sandwiches with sourdough because with five people, the loaf would be gone before we even made sandwiches for everyone. We save sourdough for a treat added onto a plate of roasted chicken at suppertime or eggs at breakfast. A slice also makes an amazing snack on it's own. If I ever have leftovers, or a loaf that didn't rise perfectly when baking, I cut it up, then blend in the blender for breadcrumbs! They really do become the best breadcrumbs...


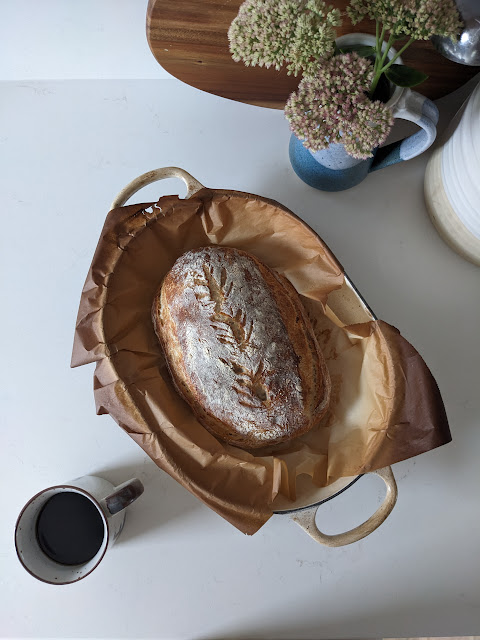
Now, sourdough! I have read a lot on the subject and tried several different online recipes, finally settling on this one for it's ease and prep time. The measurements are slightly different from the one I was trying without success years ago, so I can say for my oven and my climate, it's flawless. But I can't speak for the uniqueness of your kitchen, so you may need to try a few times too! I make the dough in the evening, let is sit on the counter all night, then do a quick shaping as the oven is pre-heating, and bake that morning. All the work happens overnight, and the proportions have never failed me yet. Want the recipe?

Ingredients:
  • 100 g sourdough starter
  • 435g cups warm water
  • 520g all-purpose flour (can be up to 25% whole wheat flour, rye, or buckwheat if you like)
  • 2 tb salt
Night Before:
  • Mix starter and warm water together in a large bowl using your fingers or a whisk.
  • Add the flour and salt
  • Combine everything into a shaggy ball
  • Cover with plastic wrap or a dish towel
Overnight: 
  • Sleep, knowing your bread is doing it's thing aka 7-10 hours of rising time
Next Morning:
  • Preheat oven to 500 degrees with your Dutch oven inside, so it too is piping hot.
  • Wet hands with cold water, then handle your dough, folding and forming into a tight oval ball. There are many "techniques" but I just kind of fold and tuck until I like the shape. The folding introduced air into the load and then traps it which leads to beautiful bubbles in your bread.
  • When dough is in the oval shape you like, coat in flour and cut a few ventilation slices in the top of the loaf. You can do straight lines on the sides or right down the middle, or get fancy and do designs. Up to you!
  • Put parchment paper in the Dutch Oven (carefully, it's very hot by now) and place your dough/loaf on it, then put the lid back on and place in the oven
  • Bake for 20-25 minutes covered, followed by another 10-15 uncovered. 
  • Remove the loaf is you're satisfied with the browning on top (this is a preference thing - some people love it quite charred on the top and they'll want to leave it in longer, others a lightly golden loaf is perfect. Every oven is different too, so keep your eyes on the oven and the light on to guide you)
  • Let cool for at least 30 minutes before enjoying.
Sometimes, if I'm working I can't make my dough in the morning, so I quickly shape when I wake up and place in a covered container in my fridge to bake that night after work. You could also change up the times of day, so long as you're allowing for 7-10 hours of rising time. You really can't compare to the flavour and texture of sourdough in my opinion, so it's absolutely worth learning. 

Sourdough Starter Recipe*

The key to creating a starter is to add flour and water together regularly, discarding about half every time you add more. In a few days you'll have a developing starter that has a hint of sourness in smell as well as lots of bubbles as proof of it's fermentation. If after several days your starter is still not rising at all, it may be too cold at your house. Make sure you add very warm water during the next "feed". You can also kickstart it by adding 1/2 teaspoon of quick rise dry yeast if you're desperate.

Day one: mix together 1/4 flour and 1/4 cup warm water.
Day two: discard half, then add 2 tb flour and 2 tb warm water
Day three: repeat day two
Day four: your starter should be active by now! If not continue, and so on... 

Maintaining your starter - Once it's active and sour, you can leave in the fridge for days, simply reinvigorating with a few tbs of water and flour 8 hours before using again. 

* Local friends, I'd be happy to give you some of my starter to get you, well, started :) 

2.2.23

Easy, Bouncy, and Delicious Focaccia

This recipe will make you famous at potlucks! Focaccia is so affordable to make, not to mention simple, but it feeds a crowd and is easily in the top ten most delicious foods on the planet. I promise. You need to try it!


I first posted the recipe on Instagram reels, but I've been meaning to put it on my blog for months. Reels are fun and give a glimpse at the incredible texture of this oily dough, but they're not as searchable and the recipe is in such tiny font. It was time to put this bread on the blog!

INGREDIENTS:
  • 2 1/4 tsp. quick rise yeast (or one packet)
  • 2 tsp. honey
  • 2½ cups lukewarm water
  • 5 cups flour (I use AP)
  • 1 tbs. salt
  • 10 tbsp. olive oil, seperated
  • any additional herbs for seasoning


STEPS
  • Simply combine all the ingredients together in a large bowl, except the olive oil! 
  • Stir to make a shaggy, sticky dough. 
  • Once combined, stir in 5 tbsp olive oil to your dough.
  • Let the dough rise for 1 hour, covered with a plate or towel on your counter.
  • Once doubled in size, pour 5 more tbs. olive on top and place into a buttered 9x13 lasagna dish.
  • Spread to fill and then using your fingers, poke deep into the bread until the dough resembles a Montreal street 🚧
  • Season with herbs, salt, and pepper and brush with more olive oil (I used a garlic olive oil and thyme)
  • Bake at 450 for 15 minutes, or until top is nicely golden 🍞✨


TIPS
  • To avoid the dough sticking to your hands, first rinse in cold water and leave them wet
  • If you use regular yeast and not quick rise, it will need 3-4 hours to rise
  • Sprinkle flaky sea salt and fresh herbs on baked bread for the best presentation
Let me know here or on Instagram if you've tried it!

6.2.22

The Best Herby Cheese Biscuits

I made a batch of these on Friday and we've been eating them all weekend with slow cooker chili. I knew I wanted a carb to go with our comforting winter chili (or any stew or soup, really), and cheese was on sale at the grocery, so I bought some cheddar and searched for a cheesy scone/biscuit recipe. There were so many but none that added herbs as I was hoping to do, and many used too much butter and cream, which felt redundant if you're already adding a lot of cheese. I love making scones, and always add tons of cream and butter in those, but with the cheese element it felt like unhealthy overkill. So I found several recipes and then significantly changed them until I came up with this.


INGREDIENTS
  • 2 cups flour (I used All Purpose)
  • 1 TB each baking powder, salt, and Herbs de Provence
  • 1/4 cup butter
  • 1.5 cups grated cheese (I used cheddar)
  • 1 cup milk (I used 2%)
  • 1 egg
STEPS
  • Whisk together flour, herbs, salt, and baking powder
  • Then cut in the butter with a fork or your hands, until well incorporated and no butter piece is larger than a green pea
  • Once flour and butter and mixed well, mix in grated cheese
  • Once those are mixed well, pour in milk and mix together with a fork or spatula
  • Mix into a ball, then roll out with rolling pin and added flour if need be (to prevent sticking to counter). Your rolled out dough should be about 1.5 inches/3cm high
  • Using biscuit cutters, cookie cutters, or a glass, cut biscuits into small circles. You could also cut into squares with a sharp knife.
  • Brush mixed egg on the tops of every biscuit (optional but really elevates the end result!)
  • Bake at 450 for 15 minutes

They are salty and light and delicious! I'm not a big cheese fan generally, but mixed into an herby, flaky bun I'm suddenly a devotee. Enjoy!

13.5.21

Half Birthdays and the Best Cake Ever

As I'm sure is the case for most people, the lingering Pandemic has led to a good degree of languishing in our home. Generally we've been fine, but with every sport and activity cancelled for the past 16 months and very limited contact with friends and family, some weeks have been harder than others. Mid-winter I found myself longing for something to celebrate. 


The kids and I all had our birthdays in the late summer and autumn, and Christmas was behind us. We still had months until Brad's May birthday and Mother's and Father's day too. So I decided that we'd celebrate half birthdays this year. I know, I know, it's a bit excessive, but seriously it was one of the best decisions I made in the Pandemic (that and buying the kids a mini trampoline!) 

Sally Clarkson in The Life-Giving Home writes about how important it is to make home that place of comfort, celebration, joy, and safety, and I have been so influenced by her practices. Though the Pandemic is *hopefully* winding down, I think we'll keep half birthdays forever for the joy they've brought us, and that additional chance to celebrate each member of our family. 


It's amazing how much those half birthdays brightened our home life! I had been meaning to try out Livia Sweets that opened up down the street and this felt like the perfect occasion. So for Chloe's 7.5 birthday, we ordered their birthday cake. Montreal friends, OMG. The birthday cake was the best cake we've ever had. While Livia Sweets did gift my family the kid's half birthday cakes, I have already personally bought two more, they're that good. My mother-in-law had her birthday two weeks after Chloe's half birthday and I promptly ordered it again. Lily and I are heading up north this weekend for a Mother-Daughter camp and you know I ordered us the two person birthday cake to eat when we arrive. This cake is truly beyond.


You can order this dream cake, or anything else on their delicious menu (including cookies and dairy-free milk delivered to your door!) from Livia Sweets. Save on the delivery fee like I did by picking it up at their storefront on 288 Ave Laurier Ouest. 

This post was in collaboration with Livia Sweets,
but all opinions are 100% my own and I am a regular customer of theirs. 
To book a collab, contact me!

13.3.21

A Kitchen First for me - Real Donuts!

This month I tried something for the first time and I'm not exaggerating when I say it has changed our weekends. REAL DONUTS. I'm fairly comfortable in the kitchen, but deep frying and yeasted donuts felt like the final frontier. The idea of heating oil, keeping it at a steady temperature, making the perfect yeasted donut dough, figuring out how to shape them without buying a separate tool, and not burning myself in the process felt impossible. 

I own a donut pan and have made dozens of variations of cake donuts, but at the end of the day those are really just muffins or cake in the shape of a donut. They're not the donuts I happily pay $4 each for from local bakeries, nor the ones I crave on a regular basis. When my friend Aimee shared her recipe for yeasted, fried donuts, and she promised it was easier than we thought, she was right. And the best part is, a batch of probably 30 donuts (and donut holes, aka Timbits IYKYK) cost around $4, the price of one gourmet donut here in Montreal. 


After making the dough - recipe found here - I shaped the donuts with a large biscuit cutter and a much smaller biscuit cutter (they came in a set) which I already had. You could also use a large glass to cut the donuts and forego the holes if you wanted, or you could buy an actual donut cutter. I try not to have single-use tools in the kitchen, but go for it! 

Then, I fried half the batch in my Dutch oven which was filled with 6 cups of vegetable oil, heated to 350 degrees. I froze the second half (15 donuts) for another weekend and saved the 6 cups of oil in the Dutch oven all week. I just put the lid on it and put it on the corner of the stove I never use (why do we all have these!?) 

The next weekend all I had to do was take out the frozen donuts, let them come to room temp (about an hour), and fry them. Much less labour-intensive than the week before! See how much they puff up once they've been fried!


The glaze is my favourite part. You can't go wrong with a simple glaze, I say! I'll be trying other glazes in the weeks to come, but for now we've settled on Clementine and Maple. Both amazing, clementine probably being the favourite. Just whisk together every ingredient and dip the cooled donuts on the glaze. Double dipping is encouraged!

Clementine Glaze - juice of 1 clementine + 2 tb heavy cream + 1/2 cup icing sugar 
Maple Glaze - 1 tb maple syrup + 2 tb heavy cream + 1/2 cup icing sugar


Making my own real donuts feels like such an accomplishment, as deep frying has intimidated me for years! It's much easier than it seems, and I'm so glad I gave it a go. It will save us quite a lot of money, as now I swear I'll never buy donuts out again, and it's just such a delicious treat to welcome the weekend with. Truly, these will be a family staple FOREVER. 

Moral of the story - try new, scary things in the kitchen (and in life!) and donuts are always a good idea!

16.2.21

Heart Cookies (for Valentines, sure, but really always) with Egg-Free Option

I make these cookies year-round, but it's only on Valentines day that I top them with light pink frosting. Sometimes I add spices and call them Autumn Spice Cookies, other times they're branded as Christmas Cookies... really it's just the best simple cookie recipe ever and the possibilities are endless. I recommend starting with all of your ingredients at room temperature and chilling your dough for 30 minutes before rolling out. Egg free option below in the foot notes!


Heart Cookies 

1 cup butter
1 cup sugar
1 egg (or a flax egg*)
2 teaspoons vanilla extract
.5 tea spoon almond extract
3 cups flour
1.5 teaspoons baking soda
pinch of salt

Cream together the butter and sugar, once mixed add the egg, once mixed add the extracts.
Whisk together the flour, baking soda, and salt, then stir into the wet ingredients.

When a dough forms, chill for 30 minutes and roll out, using cookie cutters if you like. If you want a simpler route, roll into a log, freeze for an hour, and then slice into medallions. 

Bake at 350 for 7-10 minutes (depends how you like your cookies and your oven, so keep an eye out)

Dusty Rose Frosting

This all-time favourite frosting is the simple combo of 1-2 cups icing sugar (aka powdered sugar aka fairy dust) with 1/8 to 1/4 cups 35% whipping cream. It depends on how thick you want your frosting, so play around. 
To achieve the colour -  It comes from mixing the bare minimum of red food colouring (1 drop) with 1 tablespoon or more of vanilla extract. Brown + red + white = dusty rose!

Make it Egg-Free

We don't have any egg allergies, but Oli did have one as a youngster which he's thankfully outgrown. Still, I'm often out of eggs but craving cookies, so this substitute is a welcome one! 
Mix 3 tablespoons water with 1 tablespoon ground flax seed. 
Refrigerate for 30 minutes and see the liquid turn into a gel. Use as you would an egg in baking.


26.1.21

Winter Rhythms (and Homemade Hot Chocolate)

Rythms or rituals or habits - call them what you like, but don't deny that they, one by one, make a life. The small things we do and then do again and again until they become instinct are the building blocks for our memories, who we are, and how we live. And they're always ebbing and flowing as we age and change, but I love that some things always stay the same. 

Even well into my 30's I still recognize the magical stillness of the first big snowfall of the season, and the thrill of my footsteps being the first ones on untrodden snowy territory. I still remember the bliss of laying in deep fluffy snow, warm in my snowsuit, wishing I could sleep for hours on my winter bed. The simple project of building a snowman, the awe in seeing normal landscape heavy with white, the deep feeling of comfort when arriving to a warm home after these adventures. 

Living vicariously through my children brings these pleasures flooding back and I'm so grateful for the chance to see the winter world through their eyes. As an adult I'm tempted to fixate on the challenges or extra laundry, a messy entry way, and a car covered in snow, but the rhythms of playing in the snow, embracing the cold, and warming with hot chocolate and a fire after it all prevent me from curmudgeonhood. 

A couple of years ago, when we ran out of the store-bought hot chocolate mix and I wanted to make the kids a warm treat after a particularly chilling playtime outdoors, I came up with a homemade recipe. After many tweaks, I settled on my tried and true recipe and I'm happy to share it today. All told, it costs about half the price of store-bought mix (depends where you buy your ingredients, of course) and it endlessly versatile to your milk preferences. We add peanut butter to ours to make it more filling and it tastes like Reese's chocolate which I highly recommend, but leave it out of it's not your thing.


Homemade Hot Chocolate (serves 4)

Ingredients:
1/2 cup cocoa powder
2 cups milk (we use oat, cashew, or cow's)
2 tablespoons peanut butter (optional)
1/4 cup cane sugar or maple syrup


On medium heat, whisk together the cocoa powder, milk, and sugar until thoroughly mixed (a few minutes). Then stir in peanut butter until blended (a minute or so). That's it! I love this recipe as it's much more affordable than buying hot chocolate mix and it takes no added time (to boil the kettle for the mix is the same effort as warming milk on the stove, I promise!) 

Five minutes and four simple ingredients and you have delicious homemade hot chocolate, the perfect welcome home after hours in the snow. 

6.1.21

the January donut (and thoughts on rhythms, heaven, health, and balance)

I call these the January donut 🍩, not because it's a month for resolutions and dieting and self-loathing, heck no. I've just always been someone who is happy with change and goes in opposing directions often as a result. Hence, quite healthy food this month.


In December I go hard into celebrating, because Christmas is truly the most celebratory holidays and for good reason! We ought to eat, drink, and be merry then of all times, because our weary souls rejoice in the little Lord Jesus coming to make his blessings flow, far as the curse is found (yes, that run on sentence was a mash up if several Christmastide carols, I hope you noticed). So yes, celebrating and feasting is not just OK it's utterly appropriate. 

And now we're here at the closing of Christmastide and my body is craving a change. Sweets and booze and roasts and carbs and rich fare are meant to be treats, appreciated by the partakers. If you don't think that's Biblical, I invite you to read Revelation and see what Christians believe heaven will be like! 

This side of heaven though, there is such a thing as "too much of a good thing" and I'm feeling the effects of a month of plenty. Craving fresh vegetables and whole foods, eschewing desserts and alcohol for a few weeks. Anyone else feel this way in January? As I said, this is not a resolution or a diet, it's balance.


January donuts are a must! 

Mix together: 
2 eggs 🥚🥚
1/4 cup maple syrup 🍁
1/4 cup coconut oil 🥥
1/2 cup Greek yogurt 🥛
1 cup grated carrot 🥕
1 banana 🍌
1/4 cup oats 🌾
1 cup flour + 1 tablespoon baking powder ⚪
1 tablespoon vanilla extract 🟤

Pipe into a donut pan or muffin tins, bake at 350 for 15 minutes or so (this will depend on your oven so keep an eye out), top with vanilla Greek yogurt, and enjoy. 

28.10.20

Autumn Spice Cookies!

I was *so tempted* to call these pumpkin spice cookies, even though there's no pumpkin in them whatsoever, because most things that carry that monkier don't have any either, but I resisted the urge. 


Autumn spice seemed perfect, because though I find the flavours of cardamom, nutmeg, and cinnamon comforting and nostalgic, I don't want to taste them in April or July. They're cold weather flavours, those warming spices, and made for Autumn. These cookies too are made for Autumn. 


You don't need turtlenecks, sweaters, and squirrels, but goodness they are perfect for a Fall cookie! The essential is really the warming spices of cinnamon, nutmeg, and cardamom. The glaze is tasty but completely optional. Enjoying these cookies on a cold day with hot tea is a must!

Autumn Spice Cookies

Wet Ingredients
1 C butter, softened
1 C granulated sugar 
1 large egg
1.5 ts vanilla extract

Dry Ingredients
3 C flour
1.5 ts baking soda
1/2 ts cinnamon
1/2 ts nutmeg
1/2 ts cardamom
pinch salt

Method:
1. Preheat oven to 350, line cookie sheets with parchment paper
2. Mix together the wet ingredients and in a separate bowl, whisk together the dry ingredients
3. Combine wet and dry ingredients until a ball forms
4. Roll our in batches and using cookie cutters, make your shapes. Another option is to simply make small balls and press them flat
5. Bake at 350 for 8-9 minutes

(optional) Glaze:
3 tb icing sugar
1 tb 35% cream
1/4 ts of combinced spices (cinnamon, nutmeg, cardamom)
- whisk all together and drizzle on cooled cookies

Happy Autumn, friends!

1.4.20

let's bake Rugelach!

Rugelach is a delicious Jewish pastry and very easy to make at home! I first learned in the Smitten Kitchen cookbook, but have since made several modifications so thought it was time to post my version here. Where we live we have many Jewish bakeries, which is probably why I've rarely ventured to bake my own Jewish delicacies. The thought being, why bother making my own if theirs are so good? For that reason as well, you'll never catch me baking my own bagels. I live way too chose to Saint Viateur Bagels for that! (Technically closer to Fairmont Bagel, but if you know Montreal, you know we're split down the middle about which bagel joint is the true best). But back to rugelach.


Rugelach, pronounced roo-guh-lack, is sometimes filled with chocolate, but I always choose fruity-filled sweets over chocolate. Am I weird? The dough is a mixture of cream cheese and butter, which makes it incredibly easy to roll out. This recipe makes two balls of dough, which roll out to make 12 rugelach each. Once your dough comes together, separate into two balls and roll each ball into a large circle. Once rolled thin, spread your favourite jam all over the top of the circle in a thin layer. Too thick of a jam layer will make your rugelach unravel in the oven and just explode with jam, so as tempting as it is, limit the jam layer to two tablespoons! 


Slice your jammed circle from top to bottom, left to right, and then twice more in equal portions in each quarter. This is hard to explain without a picture, I admit, but essentially, you're cutting to reveal 12 individual triangles. You'll then roll the triangles inward from the outer edge of the circle. They'll look like little croissants filled with jam and taste even better!


Rugelach

Dough

1 cup butter, room temperature
1 cup cream cheese, room temperature
1/4 cup sugar
2 cups flour
pinch salt
  • Cream together the butter, cream cheese and sugar until well incorporated
  • Then add the flour and salt until a large ball of dough forms. 
  • Flatten each dough ball into a disc shape. Cut in two and individually wrap each dough disc for one hour or up to two days.

    You could also freeze the dough discs to use another day - just thaw them at room temperature when you're ready to bake your rugelach.
Filling

Whatever jam you like most! We used raspberry but my favourite is rhubarb or peach

Glaze

Whisk an egg and glaze each rugelach. This won't use the entire egg, but I suggest save it in a small jar in your fridge for the next baked good, because all pastries are best topped with an egg glaze! Especially scones, but I digress...

Top

Lastly, top with some raw sugar for an added crunch which is the best pairing with the super soft dough!

Bake at 350 for 20 minutes, let fully cool, and enjoy!

16.10.19

Re-making Traditions + the *PERFECT* Roast Chicken

Thanksgiving just behind us and Christmas on it's way means traditions are swirling around in my mind, both the warm fuzzy feelings associated with the familiar and the fond as well as the slightly negative aspects of tradition. Negative traditions? Can there really be such a thing? Aren't traditions something we continue doing because we love them and want to mark our lives by such cornerstones? In theory. However traditions can also be laden with guilt or leave us feeling un-creative. We might do the same thing year after year because we feel we must or can't think of any alternative. Breaking away from traditions can potentially cause hurt feelings of other family members who wish to continue. I'm by nature a traditional person but not necessarily a sentimental one, so I love the idea of annual traditions and rhythms that I can predict and look forward to, but I don't necessarily feel I must continue with what we've done in the past, especially if it doesn't feel special. When Brad and I got married and moved eight hours away from my family we were given the perfect scenario to re-think all of the traditions we've grown up with and decide which we'd keep for ourselves and which we'd re-think as a married couple. We both brought some traditions into our marriage and left many too. In recent years as our babies have grown up into children we've honed in on traditions, making some new ones each year as they can now remember for themselves what they loved from the years prior. For example, Brad and I both grew up with turkey with all the trimmings on Thanksgiving and Santa Claus at Christmas and our kids are being raised with neither.


At first we felt a bit rebellious and strange stepping out of the traditions we've grown up with, especially given our happy childhoods, but we realized that continuing with traditions simply because they've always been done without thought to our personal beliefs, tastes, interests didn't make any sense. This past Thanksgiving when I said on Instagram that we weren't doing a turkey and indeed that we didn't enjoy turkey dinner, I received a barrage of comments insisting that we go ahead with the meal, including many comments listing the benefits of the leftovers (the soups! the sandwiches!) None of which were convincing as we don't like turkey. I wasn't offended by the comments at all, but I do find it interesting how the tradition of turkey at Thanksgiving is so ingrained that it's noteworthy when a family opts for an irregular meal during the October long weekend.


This Thanksgiving, and in fact typically once a week in the colder months, we enjoyed a whole roast chicken, which I have to say is a million times tastier than turkey. Cooking a whole bird was very intimidating to me as a new cook, but after years and years it's become one of my favourite comfort foods. I love the small size compared to turkey (very conducive to condo life!). A roast chicken is one of my favourite meals to bring to a new mom or a friend who's in need of a hand. It's just the perfect meal! Le Creuset generously sent me their new Oblong Casserole to try out this Fall and though countless dishes can be made and served in this dish, to me it's life calling is to be a vessel for roast chicken!


I've tried tons of recipes over the years but I've finally settled on what I think is *the best*. This recipe cooks low and slow for starters. 300 degrees for 2.5 hours! But the oven time is completely hands off (no basting as with turkey). Also you'll create the most amazing butter and herb spread and place it beneath the skin, directly on the chicken meat. You'll fill the cavity with a pierced lemon and herbs and cook your bird atop whatever root vegetables you fancy (raddishes, potatoes, carrots). I promise you, the result is incredible!
  1. Clean your bird with water, including inside the cavity, and dry it with a paper towel.
  2. Preheat oven to 300 and clean and chop vegetables
  3. Toss vegetables in olive oil or knobs of butter, lemon zest, and salt then place at the bottom of your roasting dish (I used the Le Creuset oblong casserole which is the perfect size!)
  4. Make your herb butter spread: in a blender or by hand, combine 1/4 c room temperature butter and a few glugs of olive oil with salt, pepper, lemon zest from one lemon, 1/4 cup chopped fresh mint and 1/4 cup chopped parsley or basil. 
5. Spread the herb butter mixture all over the bird, including underneath the skin of the breasts (see picture below) This will guarantee the strongest flavouring on the meat and not just on the skin. If you gently pull the skin at the entrance of the cavity, you'll see that it seperates easily and without tearing from the meat beneath. Push the herb butter mixture all the way to the back of the bird, covering the whole top (breasts) of the bird. 
6. Stuff the bird's cavity with a lemon that's been pierced a few times with a sharp knife, which will allow more juice to come out, and whatever herbs you have leftover from your herb butter mixture. 
7. Top with a final sprinkling of salt and pepper and put in the oven for 2.5 hours, or until meat thermometer reads cooked. 

I hope you try this recipe! The meat will be falling off the bone and so infused with flavour and your vegetables will be perfectly seasoned and ready to serve. 


One chicken typically serves 3-4 people, depending on how much meat you're serving. If we're eating with the kids we'll make two which leaves leftovers for curry chicken salad sandwiches. I save the drippings in the fridge to use instead of oil when cooking vegetables the week afterwards, and make bone broth with the carcass. Maybe I'll have tempted you to re-think turkey with this recipe, or maybe not, but I hope you enjoy it and also feel the freedom to create your own family rhythms! 

This post was written in collaboration with 
Le Creuset Canadaa brand I've admired  years. 
All opinions are 100% my own.
To book a collaboration, contact me!

29.4.19

Sourdough-ish Bread Recipe (aka THE BEST BREAD EVER)

Stop everything and make this bread! Does that sound too demanding? Too urgent? I must be understating things. YOU NEED THIS BREAD. 

I've promised my recipe for months now but I hesitated to post anything until I felt I had a really solid grasp on it and could answer any of your questions about the process from experience. Well, after about three months and over 30 kilograms of flour, I'm happy to report that I've found it... one bread recipe to rule them all. You can tell this is epic if I'm dusting off LOTR jokes ;) 


Here's the origin story of this perfect bread: I was determined to make sourdough bread from scratch. The sort where you make your own yeast, essentially. You mix flour and water, let it ferment (sour as a verb) over weeks, and then use it in a high hydration (read: very wet) dough that makes angels sing. Except after weeks and a massive Costco-size bag of flour there was no singing. Just a lot of muttered choice words as I put boule after boule in the compost bin because it never rose (did I mention the rising time for most of these recipes was 24 hours? Who has time for that?!). I had made some classic country boules before using Pinch of Yum's no-knead recipe and found it easy and good, but I'd never go on record saying it was incredible. The reason everyone loves sourdough is the complexity and depth of flavour. My country boule recipe was more Wonderbread than Sourdough, but it was still a treat to pull out of the oven. 

This recipe combines the ease of my old basic bread recipe (with it's use of commercial yeast and guarenteed rise) and the flavour of sourdough (deep, rich, sour, yeasty - all good things I promise, even if they sound like questionable adjectives). It's the best of both worlds and has become our hands down favourite thing to build a meal off of. With jam and tea. Topped with curry chicken salad for lunch. Warmed in the oven with almond butter, sliced bananas, and chocolate chips for dessert. Or just plain, this bread is perfection. Want the recipe? OF COURSE YOU DO. 


Ingredients
6.5 cups (2lbs) all purpose flour
1 tb yeast
1 tb salt
3 cups (1.5lbs) luke warm water

First tip: get a kitchen scale! They cost $10 at Canadian Tire, Walmart, etc. and are so useful for baking! Measuring by weight is especially helpful if you're playing around with different flours which will have different densities, plus most measuring cups are slightly off. 

STEP 1

In a giant bowl, add all of your ingredients at once. So easy, you can't mess this step up. 

STEP 2

Stir together all of the ingredients until a shaggy ball forms. It won't look pretty, don't worry. 

STEP 3

Cover your shaggy form of dough and let sit to initially rise for 2 hours. Completely hands off, no stress. If you leave it a bit longer or shorter, again, no stress. This recipe is insanely forgiving!

STEP 4

Using your scale ideally, but you could eyeball it, cut the dough into three equal portions. You'll need a good amount of extra flour for this part. Form three unique balls of dough coated in flour.

Now for the choose your own adventure bit. You can bake right away after this step or store the dough balls in the fridge for a week or so. 

Bake Today

If you're baking today, take your ball of dough and shape it into a neat ball with a good amount of flour. Once you have the shape you want, let it rest for 30-60 minutes in the vessel you're cooking it in (see notes), then slash the top (see notes), then place on parchement paper in the vessel and bake at 450 for 30 minutes with the lid on. After 30 minutes, remove the lid to brown the top for 5-10 minutes more. Let cool fully before cutting. I know it's hard to wait, but trust me, the bread is at it's best when cooled, I promise!

Fridge Rise

This recipe makes three small sized boules or two medium sized boules, so either way you'll have an extra ball or two of dough that you're not baking straight away. Place dough balls in individual containers with lids in your fridge for up to one week. Though it's cold in there, they will continue to rise! They'll probably double in size or maybe even more, so make sure you choose a container that has room for your expanding dough. When you're ready to bake, take the dough out of the fridge, shape the dough with heavily floured hands, slash, and bake with the same instructions above. You don't need to let this dough rest for 30-60 minutes, only as long as it takes for your oven to preheat (for me this is around 15 minutes). 

right after making the dough, ready for the fridge
after 12 hours in the fridge
The Vessel

I use a dutch oven, and I'm convinced they're the best option. You can find these cast iron heavy duty casserole dishes with lids almost anywhere. I have one from Cuisinart that I found at Winners, another Le Creuset which was a thrift store find. I've used this recipe in IKEA dutch ovens too. All you need is an ovenproof vessel with a lid. 

Slashing

After forming your dough ball with heavily floured hands, slash the top with a sharp knife (serrated works best). Slashing adds air to the boule so more bubbles form in the dough (little holes in your bread). It's supposed to help with rising and texture but honestly, I just do it because it looks pretty. The cuts may seem deep but once the boule bakes they are usually filled completely, adding only very slight dimension. 


23.1.19

Chocolate Mousse Tea Cups + A Better Way To Instagram and Live

Today I have a fun story about connections and community, about motivation and getting going, and about, of all things, surprise ingredients. 

Let me start with Instagram. Many are "over" the overly curated feeds and unrealistic images and want to stop mindless scrolling, because let's be honest, there are a lot more fruitful ways to spend our time (baking bread! reading! fulfilling our goals for 2019!) And while I'm right there with you in many ways and just did a big following purge myself where I stopped following accounts I found left me feeling frustrated, playing the comparison game, or just weren't worth my time, I still love the 'gram. This recipe is one reason why. 


One of my favourite local girls I have been following for a while, @fleurmaison, posted some chocolate mousse in her stories. I'm a big believer that the 'gram needs to be interactive to be worthwhile, and I've started following more local and shared affinity accounts lately to promote this on my end. Van is local and hilarious and a brilliant creative. As soon as I saw her story I wrote her right away asking for the recipe, and she promptly sent me the link. I have this happen often as well and I love it, but every time the DMs begin with apologies or shy introductions. "Are you willing to share the recipe?" and "I feel weird asking, but I love ___ in your home, and I'd love to know where you got it if you're open to sharing". My response is always the same, "SURE! HAPPY TOO! THANKS FOR SAYING HI!" Somewhere along the line I think we believed the lie that to admire someone is shameful, or to want to learn from someone else means you're somehow less than. Instagram can promote that if we let every following relationship be one sided or spend our days scrolling through accounts of people we'd never be friends with in real life. 


So first moral: Get interactive and don't be ashamed to reach out to the people you follow on the 'gram. Or unfollow those who you feel would respond offended or coldly. Next one is easier said than done I realize, but it's January and we're all looking to better ourselves, so bear with me. If you find you want to do something, DO IT. Make the things you want to do a priority, so long as it depends on you. Of course, my goal to go to the gym is thwarted when I have a sick child at home from school, or a work deadline, or a friend needs a hand. I'm not saying to make everything your top priority - there's only space for one of those! But so long as you're able, actually DO the things you want to. Set the alarm earlier, don't waste time (scrolling cold strangers on the 'gram!), and don't be afraid to fail. I've started baking sourdough bread this month but have yet to actually make a proper boule because it's actually quite difficult! But I'm trying. And when I saw Van's mousse in her stories, I thought "oh my goodness that seems easy enough and so good... I should make that sometime..." but then I remembered that I had a spare 15 minutes and could actually put down my phone and make it RIGHT THEN AND THERE. So I did, and here's my version of the altered recipe. 


Chocolate Tofu Mousse (serves 4, 15 minutes work, 2+ hours to chill before ready)
  • In a bowl atop of a small pit of boiling water, melt 200 grams of your favourite chocolate. If you don't have a kitchen scale, the ikea chocolate bars are 100 grams, so use two. We had lots of leftover chocolate from Christmas, so I mixed a variety of Ikea and Laura Secord, dark and milk. 
  • Place 250 grams (approx 1 cup) or soft tofu in the blender and blend.
  • Add a few pinches of sea salt.
  • Slowly pour in melted chocolate to blended tofu and blend until mixed and smooth
  • Put mousse into the fridge for a couple of hours with plastic wrap pressed down on top of the mousse (to prevent a skin forming on top of your mousse)/
  • Serve in tea cups, or small ramekins, top with more sea salt

I love that this recipe is vegan and sneaks in protein but still tastes completely delicious. I served it in tea cups for the kids after school this week and only told them afterwards that it was tofu. Despite my best attempts, they don't love tofu, but they were all for this mousse! 

Hope you'll try this recipe and the other ideas too. Let's make 2019 one where we connect more with others, toss distractions and temptations in favour of productivity and enrichment. And more chocolate mousse and pretty tea cups too - that's always a good idea!

22.10.18

VEGAN Chocolate Peanut Butter Pie

Ok so let me start by saying I'm not a fan of *most* vegan recipes. There always seems to be something missing - a richness, a smoothness, a girth that animal fats so aptly bring to the table. The secret here is silken tofu (the extra soft kind). It covers for eggs and cream and has the perfect texture without even trying! Every other vegan dessert I've had uses coconut oil for this purpose, and I find coconut oil to be too dominate of a flavour - it just takes over in the vegan recipes I've tried, such that if there were coconut oil in this recipe you'd hardly taste the chocolate or peanut butter. Coconut is fine and all, but vegan recipes that use coconut oil just taste like pure coconut even when that's not the flavour profile of the recipe at all. All that to say, I've tried many vegan recipes over the years even though I'm not a vegan, and this one is the FIRST that I can hands down say tastes legitimately amazing - the same or maybe even better than a dairy infused counterpart. Are you ready to be convinced that not all vegan desserts taste like coconutty health foods? Good! Here we go.


Vegan Chocolate Peanut Butter Pie

The recipe is so darn easy, you really just need a good blender (or food processor). Blend together the following ingredients:
  • 1.5 cups silken tofu
  • 1.5 cups melted chocolate (I used a mix of dark and milk chocolate and melted it using the double boiler method)
  • 1/4 cup chocolate soy milk (but any milk would do - vanilla, dairy, almond, cashew, etc)
  • 1/2 cup peanut butter (but any nut butter would do - almond, cashew, etc)
Blend up that goodness and pour it into a prepared pie dish and then let it sit for a good while - ideally make it a day in advance but if you can't wait that long, pop it in the freezer for an hour and then the fridge for another hour and you're probably set. 

As for pie crust, I chose the non-vegan option of blending a package of oatmeal cookies together with 1/3 cup melted butter (because remember I have a thing against coconut oil), which I baked at 375 with pie weights for 10 minutes, then chilled before adding my delicious chocolate peanut butter pie filling. By pie weights, I mean I poured some dry lentils onto a piece of parchment paper which was placed on top of the pie. This helps the sides of the pie crust cook in place instead of melting down towards the middle. You can actually buy pie weights, but any dry pasta or bean will work perfectly. To be truly vegan I think the store-bought graham cracker crusts are made with oil, so you could go that route. 

The texture of this no-bake pie is uh-mazing and it's so rich, you'd swear it was full of 35% cream. Let me know if you try it!

21.9.18

Slow Cooker Boeuf Bourguignon + Slow Cooker or Instapot?

I'll be honest, I struggle with the colder months. I have such a hard time staying warm, no matter how many layers I put on, so to compensate I drink hot tea all.day.long and only cook warm meals (read: I'm not a big salad eater in the winter!). With this comes slow cooker meals at least a couple of times each week, because stews and soups are the best part of winter cooking.


I've been thinking about asking for an Instant Pot for my birthday. It was on my list last Christmas but didn't work out as they were sold out everywhere after Black Friday sales. I do love my slow cooker so much and can't find much fault in it, though the thought of making pulled pork in an hour instead of eight is definitely appealing! I don't mind the slowness of the slow cooker most days because it's often a meal I put together before church on a Sunday morning that's ready when we get home at three o'clock. The hours are certainly longer than an Instant Pot, but it's all hands off time anyway, so who cares?

Right now I feel like it's basically the same as my slow cooker but faster. Tell me how much faster and better it is, ok? I believe it also uses less energy/power which is interesting. And what's your favourite thing to make in the Instant Pot or the slow cooker? For now I'm happy with my slow cooker and last night I made an amazing Boeuf Bourguignon in it. I was inspired by one of my favourite food blogs, Modest Marce, but hers was a stove top version and I wanted to cook mine in a more hands off way so I used my slow cooker. I also tend to find that stove top stewed meat never ends up soft enough for me (read: chewy and sometimes hard instead), but slow cooking never fails me.

credit: Modest Marce

Ingredients:
  • 1 kj of cubed red meat (you can use steak or roast or anything your butcher says is good for stewing. I just use chuck meat or whatevers on sale), cut into 1 inch cubes
  • 5 strips of bacon, diced (small)
  • 5 carrots, chopped (medium)
  • 500 grams of sliced mushrooms
  • 1/2 a yellow onion, minced (very small)
  • lots of garlic
  • 2 cups beef stock
  • 2 cups red wine
  • 2 tablespoons of tomato paste
  • fresh thyme, salt and pepper
Method:
  1. Start by drying your cubes of meat in paper towel, then sear them on very high heat in a little bit of olive oil, on every side if possible. This should be done quickly, maybe 5 minutes max. Then set in your slow cooker.
  2. Cook bacon on medium to high heat and season with generous pepper (more than you think!), and place in the slow cooker
  3. In the remaining bacon grease, cook your onions, carrots, and garlic for a couple of minutes. Season with salt and pepper, and add to slow cooker.
  4. To your slow cooker add the wine, broth, tomato paste, and thyme.
  5. Cook on low for 5 hours.
  6. Cook your mushrooms on high heat, browning the outside and seasoning with generous pepper. Add then to the slow cooker for the last hour of cooking.
  7. At six hours, check thickness of your stew. If it's still too watery, add a few tablespoons of corn starch. Taste and season accordingly.
  8. Serve over pappardelle, my favourite noodle! 
This recipe makes a lot - probably 8-10 portions. Brad and I both ate large portions and there are probably 6 or so left, but we could have added a salad and baguette and eaten smaller portions. This is a great meal for a crowd or to put in the slow cooker before leaving for church on a Sunday morning (or any other outing).

Alright Instantpot lovers, convince me!

31.8.18

30 minute pizza with blender sauce

Some days I'm just craving pizza and it's lunchtime and I'd give just about anything to have a slice (or four). When I say I'd give just about anything, I obviously don't mean financially, because I could have pizza almost immediately from some of the best pizzerias in Montreal if I were willing to fork over $20+ for a pie. One of the perks and huge temptations of living in the heart of a city is that there's always amazing food just a short walk away. But with our intentional and strict budget, we take advantage of this perk almost never. We do the occasional post-church brunch or takeout sandwich and order in once in a while to treat ourselves after our twice-monthly deep clean (because who wants to clean every surface of their house and then cook dinner?!), but for us, meals are 99% of the time made at home.


I usually have pizza dough made in advance and in the freezer so I can plan ahead and take a ball of dough out to thaw in the morning for pizza night (which is typically Friday), but that doesn't help at all when pizza cravings strike at 11:30am, and don't they always? A few weeks ago I halved my go-to pizza dough recipe, blended some San Marzano canned tomatoes and herbs in my blender, and made this thirty minute pizza in time for lunch for the kids and I. It was simple and satisfying and I hope you love it.

Note: the sauce recipe makes enough sauce for about four pizzas, so you can store it away for up to two weeks in the fridge. If you're like us, two weeks is certainly enough time to use up sauce for three pizzas, but if not, there's always the freezer too.

Preheat oven to 500 degrees. I know this seems hot, but trust me.

Make the dough:
Half this recipe. You only need to let it rise for 5 minutes or so, while you're grating the cheese. Long is better, but you're hungry, right?

Make the sauce:
Drain the juice from one can of San Marzano tomatoes (they're the best but any canned whole tomatoes will technically work) and put in the blender with a bunch of parsley, salt, pepper, chili peppers, and a few glugs of olive oil. Blend, and you've got pizza sauce for four pizzas.


Bake pizza until cheese is bubbling and tomatoes look bruised and crust is as crispy as you like - around 10-15 minutes, but maybe longer depending on your oven.

Keep it simple:
I love going all out for pizzas, but a quick lunch pizza doesn't need to be crazy. I just topped with halved cherry tomatoes and dried oregano and we loved it! Thawing meat from the freezer and endless chopping are necessary evils to the delights of evening pizzas, but for a lunchtime or snack, this pizza is perfect.

13.7.18

The Best Picnic Meal - Hamburger Salad!

In the summer months we love to stay outside as long as we can. It keeps the house clean and the kids tired, not to mention it's the best time of year to get to know our neighbours! I love picnics in the park with friends and we usually have about one per week in the summer months, but packing food for a picnic can be tricky. There aren't barbecues at our local park, so anything BBQed is out which is a real shame because what is summer if not the time of year I can turn my oven off and cook outside!? Also, I only eat burgers in the summer months so they're a treat I don't like to miss out on, even if there is no BBQ in sight. Hence, Hamburger Salad.


This salad tasted just like a hamburger! It's filling and salty and juicy and sour. It has meat and carbs and veggies and pickles, just like a burger, but in salad form. So you can put it all in one container for the beach or park. It's also a great meal to bring to a potluck or to a friend who could use a hand tonight.

Ingredients:
  • 1 lb lean ground beef, seasoned with Montreal steak spice and mustard powder. Optional add ins are welcome and we could go on forever - onion powder, ground pepper, garlic, chili flakes... you do you. Just season that meat nicely, as you'd like your burger to taste. 
  • 1 cup couscous
  • 1 romaine heart (about 2.5 cups chopped lettuce)
  • tomatoes
  • red onion
  • pickles
Dressing:

Mix together the juice of two lemon with olive oil (equal parts, which will depend on how much juice your lemon yields), add garlic, grainy mustard, salt and pepper.

Instructions:
  • As your seasoned meat is cooking, chop your pickles, tomatoes, lettuce and onion. 
  • When the meat is almost cooked, pour the dry couscous into the frying pan with your meat. It will soak up the fat and taste so good! Then add about 1/2 cup water and put a lid on the frying pan for 2 minutes. If your frying pan is too large for a lid, use a cookie sheet.
  • Once your meat and couscous is cooked (it cooks so quickly so stay nearby!), set aside to slightly cool. Once cooled down slightly (you just don't want it boiling hot), mix in the chopped veggies and pour over the dressing.

21.6.18

treating myself during a busy season + 50% off Cook It

Sometimes there are seasons where I just can't get ahead. Anyone else? Lately it seems that way. Before Japan we were racing to finish work and organize for three weeks abroad, so life was hectic, but we were on top of it. And then three weeks away happened, which was amazing, but adjusting home was very difficult. For a solid week after arriving home from Japan we were so jet lagged that we could barely function. For a few mornings the kids and I were awake from 1:30am onward, FOR THE WHOLE DAY. But life goes on, and there was absolutely zero time to rest after already taking three weeks off. If this sounds like a First World Problem, please know that I am cautious of that and deeply grateful for the opportunities we've had to travel. I'm just saying this has been a very busy season for us, especially adjusting back to North American culture and Montreal-time. We've all had those seasons - a new baby, a lost job, a crazy semester, an illness, an urgent family need, even times of blessing can bring chaos. The month of June has been full of blessing but also it's been very tight and my margin was waning. Even though the timing was terrible, I also went to TGCW18 (The Gospel Coalition Women's Conference) for four days last week (more on that later), meaning Brad was solo parenting during a week where his workload was already doubled. Laundry piles were climbing, the to-do list was never-ending, our kid's needs were mounting, and our spare hours were given to ministry and catching up on work. There are always those seasons, amiright?


Before leaving for TGCW, I did myself a huge favour and ordered Cook It for the first time, and set it to arrive the day after I arrived home. I received a $40 off coupon in a flyer that was handed out at my metro station and figured it was worth a try. Meal subscription boxes are all the rage right now and for good reason - people are so busy, but take-out loses it's appeal fast. Take-out is expensive and usually unhealthy and frankly, it gets old eating out of cartons. A home cooked meal is usually just what everyone desires most, but where to find the time for meal planning and ingredient hunting? In most seasons I find cooking a pleasure but in the month of June, it was a huge burden, so the timing was perfect to give Cook It a try. This is not sponsored in any way, but hear me: it was amazing. The food was incredible, the ingredients are all sourced locally from some of Quebec's best markets and suppliers, and the meals were filling and interesting.


Cook It has a refer a friend program, and it's a way better deal than I got as I tried it out. I'm so excited to share with you so maybe you can treat yourself in the next tight season. These subscription boxes aren't typically something I can justify financially (there's a price for convenience after all), though I strongly suggest them for families with larger budgets than ours, but with the coupon code I used (and especially with the one I'll be sharing with you!), it was a great deal!

EMILYT463

With this discount code, you'll get 50% off your first TWO orders. Example: Brad and I ordered three meals for two adults. So six individual meals. With this discount, that would cost $32.50, or $5 per person, per meal. These are meals with steak and chicken and seafood though there are vegetarian options too (we just like to make sure we're getting the most bang for our buck, so we always order meat with ours!). 


So for $32.50, you'll get to choose three awesome recipes and everything you need to make it happen will be delivered to your door. Recipe, instructions, fresh ingredients. If you order a more expensive meal plan (say, for more people, or more meals), it's an even larger savings because it's 50% off the total cost of your first two orders.

This is Quebec-only for now, but they hope to expand to Ontario. For now, Quebec friends, check out Cook It. It's been a crazy season for us and I was so thankful to take advantage of this offer. Our kids are finishing school this week and then slower times lay ahead. We are ready for lazy summer days, a lighter schedule, and more normal. I'm excited to get creative in my kitchen on my own terms again, too. But for now, Cook It to the rescue!

**This post is not sponsored, though with the refer a friend 
program, I will receive a gifted discount on my next order.